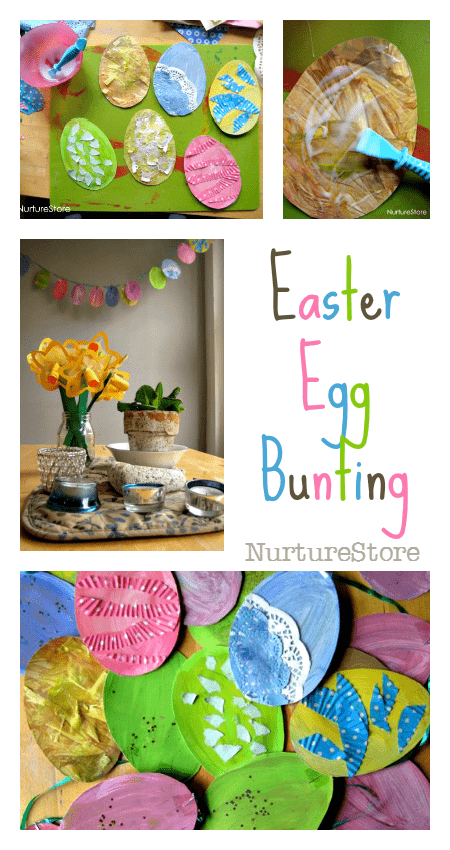
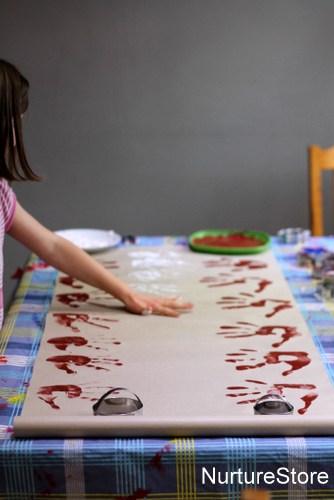
With less than two weeks until the holiday weekend the NurtureStore house is now full on baking, painting and generally bursting with Easter crafts! I’ve got a great idea today for an Easter creation station, which invites the children to glue, stick, paint, tear and create to their hearts content.
DIY clay heart bunting
Homemade gift wrap made with Christmas scented paint
Can you hear those jingle bells? Christmas crafting has begun! This homemade gift wrap made with Christmas scented paint is the first of many Christmas crafts that are on the way – but this one is the best smelling!
[Read more…]
Christmas angel craft for kids
Ever so simple, and ever so pretty: here’s how to make a Christmas angel craft for kids.
[Read more…]
Christmas salt dough recipe :: Joy!
Let’s use salt dough to create a candy cane-coloured set of letters that you can use as decorations or for spelling work.
Watch our Playdough Masterclass
Click play on the video above to see our playdough masterclass.
This video gives you everything you ever wanted to know about play dough: how to make homemade playdough with quick and easy recipes; the benefits of playdough for children; and lots of sensory play activities using play dough including playdough math activities, playdough literacy activities, and playdough fine motor skills activities.
Plus find out how to get printable playdough recipe cards and printable play mats. It’s an excellent beginners guide to play dough!
Subscribe to NurtureStore’s YouTube channel to get more gardening and nature study videos!
Materials needed:
:: large bowl
:: flour
:: salt
:: water
:: wooden spoon
:: baking tray
:: red and white acrylic paint
:: paint brushes
:: Modpodge or varnish (optional)
To make salt dough take a large bowl and in it mix:
:: two cups flour;
:: two cups salt; and
:: one cup water
Use a wooden spoon or your hands to bring the ingredients together to form a dough.
Then you can use the dough to make any shapes, numbers or letters you like.
You might like to make a whole alphabet. To bake your shapes, place on a baking tray and cook in a cool oven (Gas 1/2, 120C, 250F) for about 2 – 3 hours. (Thicker shapes may take longer.)
Once they’re baked and cool, paint your shapes with red and white acrylic paint. You can use different patterns of spots, stripes and swooshes.
Add a layer of Modpodge or varnish if you would like, for extra durability.

Download your ready-made Nativity UnitDownload the Play Academy’s ready-made Nativity Unit and you’ll have everything you need to lead a set of activities to introduce your children to the Nativity story.
This Unit includes artist-drawn puppets/colour-in nativity scene characters and printable Bible verse cards, that your children can use year after year.
In this Nativity teaching unit your children can:
:: learn about the Nativity and create their own Nativity book or small world scene using colour-in puppet / nativity scene characters
:: learn about Mary and Joseph’s journey, and explore junk modelling
:: learn about the shepherds role, and explore loose parts
:: learn about Jesus’ birth
:: learn about the three wise men, and complete their book / re-tell the story in their small world

Bonus Nativity thematic unit printables
The Play Academy’s thematic units come with practical printables that make the lessons more engaging for your children and easier for you to teach.
No need to go searching for printables to accompany your lessons, they’re all included when you download your chosen unit.
In this Nativity Unit you’ll receive these bonus printables:
:: My Nativity Story book to write, colour and complete to tell the Nativity story
:: a set of artist-drawn My Nativity Puppets to colour, cut out and use to re-cap and act out the Nativity story
:: Nativity Vocabulary Cards to recap and consolidate learning
:: Nativity Bible Verse Cards to read, narrate your own acting out of the story, and perhaps to memorise
How to download this Nativity thematic unit
You can download this unit along with over 50 more from NurtureStore’s Play Academy.
If you are already of the Play Academy, you can download this unit straight away from our Library here.
If you are not yet a member, find out more and choose your first unit here. Your teaching is about to get a whole lot easier!
Easy handprint Christmas wreath for kids
This handprint Christmas wreath is easy to make and oh so festive!
This article is one of NurtureStore’s easy Christmas crafts for children and part of our Christmas activities and crafts.
Easy handprint Christmas wreath for kids
Remember the scented Christmas paints we used to make our homemade Advent calendar? We couldn’t resist getting our hands in!
We used a roll of brown paper to stamp out lots of colourful handprints. The whole family joined in, all except for the cat ~ although my daughter was quite keen on that!
Then we cut them out, so we had lots of prints in a variety of sizes from little sister right the way through to daddy-size.
To make our Christmas wreath, we drew round a dinner plate on some card, then drew round a side plate in the centre, to give us our ring.
We covered the cardboard ring in glue and started to place the handprints on.
You can use a variety of colours, or stick with red and white.
Be as random or as meticulous with your pattern as you like.
You might like to use the adult-sized handprints around the outer edge, then fill in the centre with some over-lapping child-sized prints.
We filled the whole circle, added a ribbon at the back, and our easy handprint Christmas wreath is ready to hang.
More Christmas activities and crafts
See our full index of Christmas activities, lesson plans and crafts for even more great ideas.