These crispy nest cakes are a classic, no-cook cake. They’re perfect for Easter and perfect for little children to make.
by Cathy James
These crispy nest cakes are a classic, no-cook cake. They’re perfect for Easter and perfect for little children to make.
by Cathy James
Fairy tales are such an important part of childhood, helping children explore emotions, and think about experiences in the big wide world from the safe and secure environment of home. Make a set of DIY fairy tale fridge magnets for some fun storytelling of your own.
by Cathy James
What all the best-dressed kids are accessorising with this season: make your own bag!
by Cathy James

![]()
QUICK RESOURCE >> Download your ready-made Nativity Unit here
You can use this robin as a Christmas decoration or make a family of them to play with. It’s probably better suited to children aged 6 plus (my 4 year old hasn’t got the patience to make it, but my 7 year old loves them) and is a nice craft to do an a cold winter’s day as you sit on the sofa and chat.
You will need: card to make two rings, scissors, red yarn, brown yarn, glue, card to make eyes and a beak
1. Cut two circles from a piece of card. We made ours about 7cm in diameter.
2. Cut an inner circle in both the circles. The bigger you make this circle, the longer it will take you to complete your pompom. We made ours around 3 cm in diameter.
3. Start by making the red breast. Take 75cm lengths of yarn and wind them around the ring. Keep them close together, just where you want the red breast to be.
4. Use 75cm lengths of brown yarn to wind around the remaining section of the ring. Keep adding in lengths of yarn until your ring is full and there is no space left in the centre to thread any more yarn – but remember to just keep the red yarn to one section.
5. Use some scissors to cut around the outer edge of the ring, so the yarn fills out to create a ball.
6. Take another length of yarn and tie round, inside the two rings of card. Knot tightly to hold all the threads of yarn in place. If you’re making a decoration you can use the long lengths of yarn to hang it up, otherwise you can trim them.
7. Tear off the rings of card and fluff out your pompom.
8. Add eyes and a beak and you have a fluffy little robin.
Why not make some smaller ones to create a family?
Let’s make this winter the year when we delight in the cold and the dark.
Gather your children, get cosy, and make memories and connections together.
I’ll show you how with this guide to a cosy and connected winter:
…. CLICK HERE FOR YOUR GUIDE ….
![]()
by Cathy James
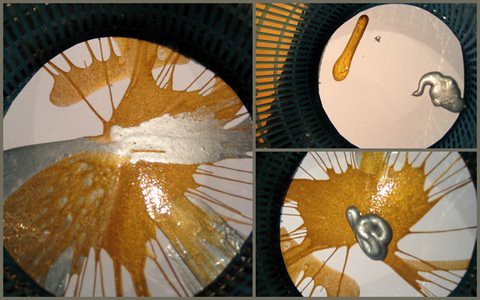
This craft was meant to be. We’ve wanted to have a go at spinning art for a while, so last week I went out to try and buy a salad spinner. As we were intending to get it covered in paint I didn’t want to spend a fortune on one but in any case fate intervened. As I walked passed a charity shop, guess what I spied on the shelf inside? One salad spinner! Sold.
Salad Spinner Painting.
You will need: a salad spinner, paper plates or circles of paper/card to fit in the spinner, runny paint, glitter is optional
You can use one big circle of card which fills the whole of the base of the spinner, or you can put several smaller circles of card in the base and put paint on each one. These smaller ones are good if you’re making gift tags.
1. Check if your salad spinner has drainage holes in the botton and if it does, sit it on a plate or tray to catch any paint.
2. Place your paper plate or circle of paper / card in the bottom of the salad spinner basket. It’s a good idea to hold it in place with a piece of Bluetac.
3. Put some blobs of the runny paint on the plate / paper / card.
4. Replace the lid of the spinner and get spinning.
5. Take off the lid to check your design. Do you want to spin again? Add some different colours? Sprinkle some glitter on while the paint is still wet?

We’re going to use our designs to make Christmas decorations and gift tags, by punching a hole and adding some ribbon.
This spinning technique is also great for trying out colour mixing – add a blob of blue and yellow and spin to make shades of green.
You could make a fantastic mobile from your paper plates, or turn them into planets to make a space scene.
Have you tried salad spinner painting? How did you use your designs?
happily shared with Tot Tuesday and ABC and 123
by Cathy James

This article is one of NurtureStore’s easy Christmas crafts for children and part of our Christmas activities and crafts.
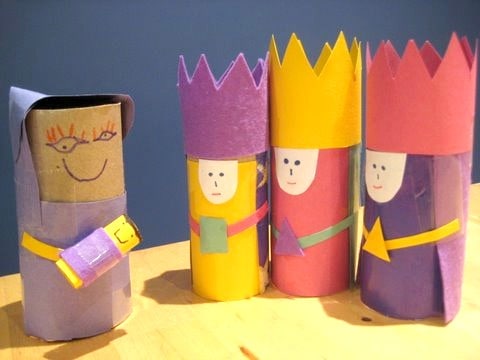
Do you have a nativity scene your children can play with? Advent begins today and I know my girls will spend December dressing up as kings, reading Christmas story picture books and generally bursting into a round of Away In A Manger at any opportunity.
We have a beautiful nativity scene which decorates our sitting room each year but it is too delicate for the girls to play with, so this year we decided to make a version the girls can use. And you’ll probably guess what are figures are made of: paper rolls.
The figures were made by wrapping fabric and card around the tubes and glueing into place: a very simple design the girls can make with just a little adult help, and giving them their own nativity to play with to their hearts content.

See our full index of Christmas activities, lesson plans and crafts for even more great ideas.

