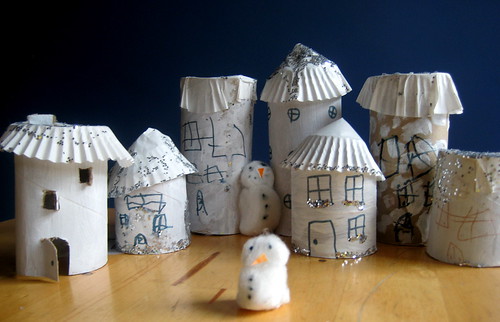
My latest free ebook is packed with ideas for junk modelling.
Junk modelling is just perfect for free, creative fun – with lots of opportunities for developing maths and literacy skills as you play.
Download your free copy [Read more…]
Junk modelling is just perfect for free, creative fun – with lots of opportunities for developing maths and literacy skills as you play.
Download your free copy [Read more…]
Following on from yesterday’s The Very Hungry Caterpillar craft ideas for caterpillars, today we have a selection of butterfly crafts.
The designs are all very simple again, making them easy for very young children to try.
Working with the idea of butterflies gives the opportunity to talk about symmetry and with older children you might want to encourage them to focus on creating matching patterns, as part of a more mathematical activity.
With young children though I think the main purpose behind these crafts is to invite them to enjoy the colours and see what patterns they can make – so I wouldn’t worry about strict directions about making sure both sides match.
This idea is a childhood classic – painting on one side of a piece of paper, folding and squishing the paint, and then opening it up to reveal your butterfly.
I particularly love this technique because it’s open to all children – even babies. Everyone can join in: finger painting, smearing colour around, making hand prints, using brushes or sponges to apply the paint. And my kids really love the surprise reveal when the final pattern is peeled open and revealed.
Two tips I’d share:
1. It might be hard for the children to understand the idea of painting at first on one side of the paper only, and you won’t want to pester them all through the activity to stop painting on the other side. If you fold the paper over so the side to be kept clear is underneath and only the side that needs painting is presented to them (see above), then they can go for it, applying the paint wherever they like, without any restrictions. When they’ve finished you can fold it the other way to make your print.
2. I’d do a demonstration of the folding and squishing first before using their own art work – some children can be very upset if they think you’re spoiling their design, so best for them to be happy with the plan before you try it.
These twirling butterflies were inspired by an idea Amanda created for Make and Takes. Amanda’s children made ladybirds, but I think they’re also beautiful with a butterfly design, and the kids can paint, pattern or collage any design they choose.
Make and Takes has a step-by-step guide to assembling them.
A tip I’d add: if you laminate the pieces of card before assembling them they’ll withstand a little rain so you can have them twirling in the garden.
We used a wooden clothes peg to make a butterfly mobile: here’s our step-by-step guide showing how we made it.
Kicking off our celebration of Eric Carle’s birthday this week we’re sharing three The Very Hungry Caterpillar craft ideas.
The Very Hungry Caterpillar is our favourite of Eric Carle’s books and is the first book I ever read to both my girls. It’s masterpiece of a children’s story, a joy to read and look at, and bursting with possibilities to use as a spring board for lots of crafting, exploring and learning.
Mr. Carle is celebrating his birthday this week and Kate at An Amazing Child blog is hosting a week of fun, linking up many early years bloggers who are sharing ideas for activities and crafts linked to Mr. Carle’s books. We’re sharing some caterpillar craft ideas today and some butterfly crafts tomorrow. On Thursday we have a post full of ideas you can use to explore The Very Hungry Caterpillar with links to the EYFS.
Eric Carle is famous for his signature style, combining colour and texture and The Very Hungry Caterpillar is a perfect book to use to inspire children to try some art and crafting. When creating with young children I always like to give them plenty of opportunity to explore materials their way. Even though these projects are all designed to result in a caterpillar there is plenty of scope for each child to experiment and add their own style to the creations. The caterpillar crafts are all very simple to follow, inviting even very young children to have a try. [Read more…]
Following on from Suzanne’s guest post which showed a wonderful whole-class collaboration to create a Rainbow Fish craft, here’s a fish tank craft on a smaller scale. L celebrated her fifth birthday this weekend with an ‘under the sea’ party and all the guests made their own aquarium complete with a beautiful rainbow fish to swim around in it. This junk model fish tank is easy to make, with just a few simple instructions and also gives each child the scope to be creative and create exactly the kind of fish they like best.
Here’s how to make a junk model fish tank [Read more…]
How to make a fairy garden
After making our miniature garden last week, the girls re-discovered our outdoor fairy garden at the weekend. The one we made last year has been well played with but was in need of a little spring cleaning, so they hunted round the garden to see what they could find to give it a revamp.
An old, broken plant pot has been given a new lease of life as a house, with a path of mussel shells leading up to the entrance – very neatly laid in ascending size order by L.
A few twigs for the framework and some woven garden twine provided the fences.
A lucky find was another old plant pot which had been completely overgrown with moss – giving them a perfect circle to make a lawn with. B peeled off some bark from an old log to make a bench and L laid out some cockle shells ‘all in a row’ for a border.
Two longer twigs make an archway, marking the entrance to the garden – I wonder if we can find a tiny plant which might grow over it?
Did you make a fairy garden with your children? If you have a link to share, the girls would love to see where the fairies live in your garden.
Find lots more fairy garden inspiration at the Magic Onions Fairy Garden Competition 2011
happily shared with get your craft on and abcand123 and tot school and the Sunday Showcase and Craft Schooling Sunday and outdoor play and Friday’s nature table and It’s Playtime and Kids Get Crafty and Works For Me Wednesday
A miniature garden makes a wonderful child-sized space for some small world play. We’ve made dinosaur lands and fairy gardens before but here’s B’s version of what a back garden should look like.
Small world play gives children the opportunity to be masters of their mini universe. They can role-play situations they’re working on in real life, testing out different ways to handle things. They also get the chance to stretch their imaginations and be creative in their little world, exploring possibilities that just aren’t possible in the real world. It’s always interesting to sit and observe children engaged in small world play, to listen to the language they’re using and get an insight into what’s occupying them at this stage in their life.
Make a miniature garden of your own
Here are our miniature garden ideas
1. Choose a container. We used an ice cream tub for this little garden and have found under-bed storage boxes to be a good size for slightly bigger play worlds.
2. Prepare the ground. If you’re going to grow real plants (which is highly recommended by us as the children get to see their garden develop) you’ll want to make some drainage holes in the bottom of your container – so it’s not going to turn into a swap. (That’s a landscape idea to try another time!) Then fill your container with soil. You can still play with your miniature garden inside, just sit it on a tray to catch any drips.
3. Add some landscaping. Use lollipop sticks and twigs to build fencing and make wigwams for your plants to grow up. Gravel and shells can be used for paths. Lids from food jars, tin foil or small mirrors can create a pond.
4. Get planting. Select plants which will stand up to some play and which will retain a miniature size. We like using grasses, which are fun to give a haircut, and easy maintenance plants such as houseleeks (semper vivum). B wanted something pretty too so she added a tiny viola.
5. Add some embellishments. You can borrow items from your dolls’ house to make a seating area, or make some chairs and a table using corks and pebbles. Use some twigs or wooden kitchen skewers and string to make a washing line or some bunting. When I was a child we used to use seeds placed in rows to make a vegetable garden. Let the children use their imagination and see what they can create.
If you make a miniature garden of our own will you share a photo with us on our Facebook page? We’d love to see what you create.
Our Happy Handmade resource is bursting with colourful and imaginative crafts and DIY toys that are designed to add even more colour and creativity to your home. With easy-to-follow tutorials and free patterns and printables, you can read, make, and start playing today! See more of Happy Handmade here.