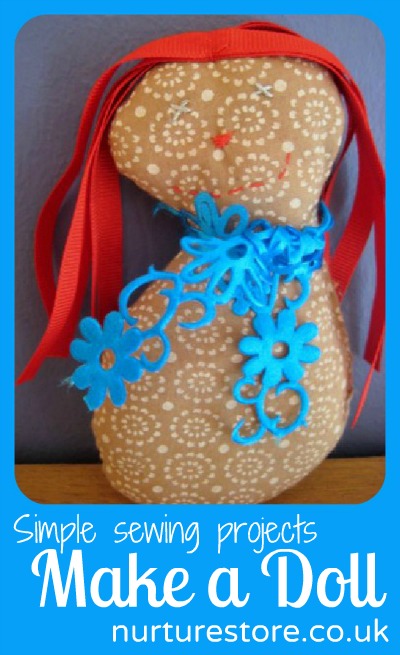
Here’s a fun simple sewing project for a child: how to sew a simple doll.

Simple sewing projects: how to sew a doll
We were inspired by Megan and her daughter over at Sorta Crunchy to have a go at a simple sewing project this week, to see if we could make a doll.
We’ve tried embroidery before and made some stitched bookmarks but this was a little more adventurous for us – and I think it turned out great! (She’s called Ruby by the way.)
Megan made some wonderful toys with her daughter – do hop over and see how they made theirs as their technique is great for capturing some kid’s art as well as sewing. But my girls did not want to do any sketching – they wanted to get straight to the material! So here’s what we did to make a doll.

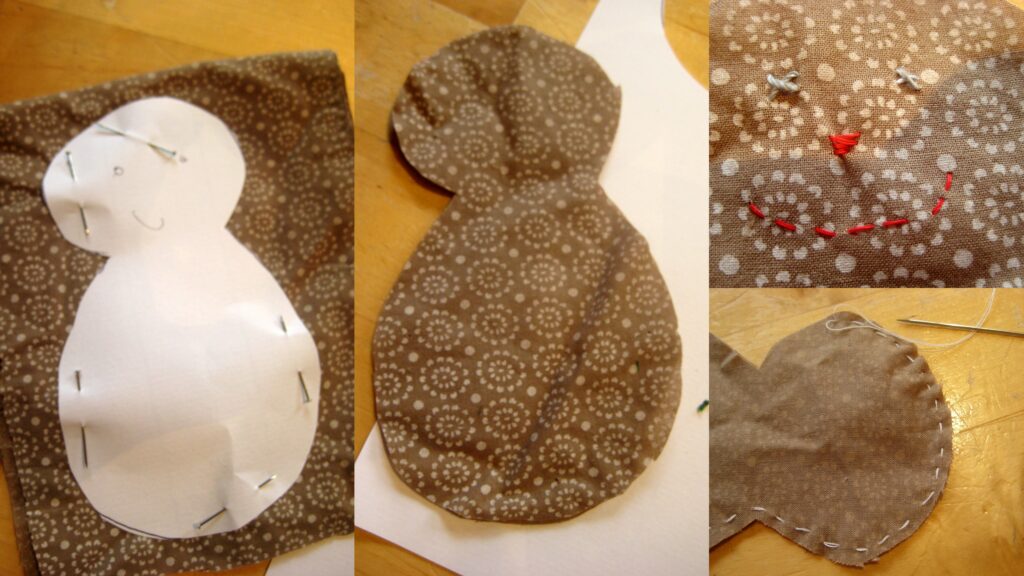
This was a spontaneous ‘what shall we do today’ project, so we used the materials we had available: fabric from a now too small skirt and some cottonwool for stuffing. I just about persuaded B to draw out a doll shape, rather than free styling with the scissors straight on the material, so she drew an outline on some paper, which became our pattern. She cut it out and I helped her to stitch a face.
We placed the right (patterned) sides together and used the simplest running stitch to sew round the edge. B told me it’s hard work to sew with little tiny stitches but I think this is a great lesson that taking things slowly with attention to detail is sometimes what’s needed. We left a little gap, turned the doll right side out and filled her with some cottonwool. After stitching up the final gap, and adding some ribbon hair, she was done. And isn’t she pretty!

L wanted to make something too of course and decided to made Ruby a pillow. She was very keen to do everything herself, so she drew the pattern, pinned it on and cut it out all by herself. She found the stitching a bit hard so had a little help with this and then she was back in charge for the stuffing. I did suggest turning the pillow inside out, to give a neat edge to our finished pillow – but that suggestion was whole-heartedly rejected by the Girl In Charge.
I’m so pleased with this project. The girls are just beginners at sewing, and I’m not very much better either, but I think the doll turned out so well – and the girls are so pleased that they did each step and managed to make a doll and pillow for themselves.


Both the pillow and the doll are great projects for beginning seamstresses. We might get adventurous and try a pillow soon.
Lovely doll. Really cute and the hair reminds me of Everything Rosie’s hair (Cbeebies!) Definately loads of potential to create a whole range of these little dolls with all sorts of different fabrics and ribbons.
This is the perfect kind of project because it can be done by a child without too much help from the adult. A real learning project. I love it!
love this, so sweet and a great project to introduce sewing! thanks so much for sharing on Craft Schooling Sunday!
I’m a bit behind on my blog reading, so obviously I am a little late seeing this, but how DARLING! Both projects turned out so cute. It’s funny when they really start to assert their opinions over what is being created. It’s hard for me to go with the flow sometimes, but it’s really important, I suppose!
Oh I love this… what a lovely simple shape to use too. My girls are keen to try sewing on the machine and I think that shape would be easy enough for them to follow… thanks for sharing!
katepickle – I think the sewing machine will be a great next step for us too. My girls would love to get their hands on the machine!
I’m sort of tempted but still haunted by the memories of failing sewing in 7th grade!! I think I could handle something like this, but one never knows with me! Either way, yours came out great, and I’m so glad you took the time to do that with your girls–they’ll probably never forget it!
Thanks for sharing this with us at Rub Some Dirt On It!
That is a great tutorial. We just finished making worry dolls- kudos to you for using needle and thread! Thank you for linking up to The Sunday Showcase!
Aaah these sort of projects are just the cutest! Particularly like the little pillow at the end. Lovely 🙂 and great sewing skills!!
Thanks for joining Kids Get Crafty – always fab to have you there!
Maggy
wonderful projects
Stopping and following with Happiness is HOP
This looks like a very fun and easy project, and it turned out really neat looking- I love the design- great job!! ~April
I’m fascinated by the scarf on the doll — is that cut felt? How in the world did you do that?
Hi marci. The scarf is just a little piece of scrap ribbon that we picked up in the ‘bargain bin’ of our local haberdashery store. As it was a pre-cut design I’ve no idea how it was achieved – sorry!